


12.1.1概述
简介
DHCPv6 Snooping是一种安全功能,包括不受信任的DHCPv6客户端和信任的DHCPv6服务器之间的防火墙功能,其功能行为如下:
• 验证从不受信任的源接收到的DHCPv6消息,并过滤掉无效消息。
• 建立和维护DHCPv6 Snooping绑定关系的数据库,其中包含DHCPv6客户端租用的IPv6地址信息。
• DHCPv6 Snooping功能在软件中实现,所有DHCPv6消息在芯片中被拦截直接发往CPU进行处理。
12.1.2配置举例
1.组网拓扑
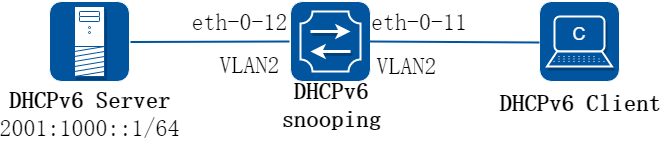
图12-1DHCPv6 Snooping
上图为测试DHCPv6 snooping功能的网络拓扑,需要两台PC机和一台交换机构建测试环境,具体分配可参照如下描述:
• 计算机A作为DHCPv6服务器
• 计算机B作为DHCPv6客户端
• 交换机作为DHCPv6 snooping
2.配置步骤
步骤 1进入配置模式
Switch# configure terminal
步骤 2进入vlan配置模式并创建vlan
Switch(config)# vlan database
Switch(config-vlan)# vlan 2
Switch(config-vlan)# exit
步骤 3进入接口配置模式,配置接口属性
Switch(config)# interface eth-0-11
Switch(config-if)# switchport
Switch(config-if)# switchport access vlan 2
Switch(config-if)# no shutdown
Switch(config-if)# exit
Switch(config)# interface eth-0-12
Switch(config-if)# switchport
Switch(config-if)# switchport access vlan 2
Switch(config-if)# dhcpv6 snooping trust
Switch(config-if)# no shutdown
Switch(config-if)# exit
步骤 4使能DHCPv6 snooping全局特性
Switch(config)# service dhcpv6 enable
Switch(config)# dhcpv6 snooping
Switch(config)# dhcpv6 snooping vlan 2
步骤 5退出配置模式
Switch(config)# end
步骤 6检查配置
根据如下步骤,检查接口配置是否正确。
Switch# show running-config interface eth-0-12
!
interface eth-0-12
switchport access vlan 2
dhcpv6 snooping trust
!
Switch# show running-config interface eth-0-11
!
interface eth-0-11
switchport access vlan 2
!
使用如下命令,检查DHCPv6服务状态。
Switch# show services
Networking services configuration:
Service Name Status
============================================================
dhcp disable
dhcpv6 enable
使用如下命令,打印dhcpv6 snooping配置,检查当前配置。
Switch# show dhcpv6 snooping config
dhcpv6 snooping service: enabled
dhcpv6 snooping switch: enabled
dhcpv6 snooping vlan 2
使用如下命令,检查dhcpv6 snooping的统计信息。
Switch# show dhcpv6 snooping statistics
DHCPv6 snooping statistics:
============================================================
DHCPv6 packets 21
Packets forwarded 21
Packets invalid 0
Packets dropped 0
使用如下命令,显示dhcpv6 snooping绑定信息。
Switch# show dhcpv6 snooping binding all
DHCPv6 snooping binding table:
VLAN MAC Address Lease(s) Interface IPv6 Address
============================================================
2 0016.76a1.7ed9 978 eth-0-11 2001:1000::2
12.2.1概述
简介
攻击者仿冒网关向网络中的用户发送RA报文,会导致用户使用错误的IPv6配置参数,造成用户无法正常通信。
IPv6 ND Guard提供两种方式在二层设备上阻止RA报文攻击:
• 为端口配置角色。如果端口角色为host,直接丢弃RA报文;如果端口角色为router,直接转发RA报文;
• 为接口绑定ND RA guard策略。根据策略下配置决定RA报文是否被丢弃;
端口角色的优先级高于ND RA guard策略。
12.2.2配置举例
1.组网拓扑
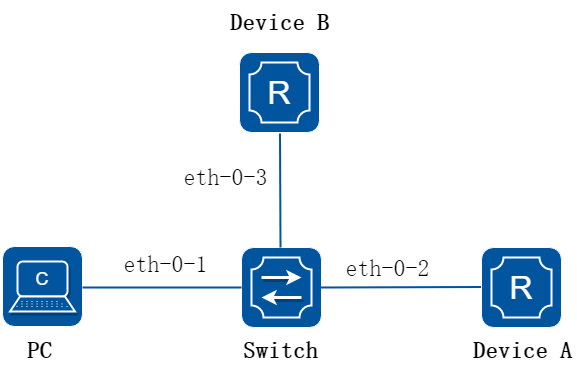
图12-2IPv6 ND RA Guard
上图为测试ND RA guard功能的网络拓扑:
• eth-0-1连接的为PC,配置端口角色为host
• eth-0-2连接的为路由器,配置端口角色为router
• eth-0-3连接的为路由器,配置端口应用ND RA guard policy
2.配置步骤
步骤 1进入配置模式
Switch# configure terminal
Switch(config)#
步骤 2全局使能IPv6
Switch(config)# ipv6 enable
步骤 3配置接口eth-0-1 ND RA guard role为host
Switch(config)# interface eth-0-1
Switch(config-if)# no shutdown
Switch(config-if)# switchport
Switch(config-if)# ipv6 nd raguard role host
Switch(config-if)# exit
步骤 4配置接口eth-0-2 ND RA guard role为router
Switch(config)# interface eth-0-2
Switch(config-if)# no shutdown
Switch(config-if)# switchport
Switch(config-if)# ipv6 nd raguard role router
Switch(config-if)# exit
步骤 5创建MAC ACL
Switch(config)# mac access-list mac_acl
Switch(config-mac-acl)# permit src-mac 0.0.1 0.0.0
Switch(config-if)# exit
步骤 6创建ND RA guard策略,并配置一些匹配项
Switch(config)# ipv6 nd raguard policy p1
Switch(config-raguard-policy)# managed-config-flag on
Switch(config-raguard-policy)# match mac-address mac_acl
Switch(config-raguard-policy)# exit
步骤 7配置接口eth-0-3应用ND RA guard策略
Switch(config)# interface eth-0-3
Switch(config-if)# no shutdown
Switch(config-if)# switchport
Switch(config-if)# ipv6 nd raguard apply-policy p1
Switch(config-if)# exit
步骤 8退出配置模式
Switch(config)# end
步骤 9检查配置
查看ND RA guard策略的相关配置。
Switch# show ipv6 nd raguard policy
RA guard policy resourse : 1/128
ND RA guard policy: p1
--------------------------------------------
Hoplimit minimum : 1
Hoplimit maximum : 255
Managed-config-flag : on
Other-config-flag : -
Preference maximum : -
Source-mac-address acl : mac_acl
IPv6 source-address acl : -
IPv6 RA-prefix acl : -
---------------------------------------------
显示端口eth-0-1的ND RA guard报文统计信息。
Switch# show ipv6 nd raguard statistics interface eth-0-1
ND RA guard statistics on: eth-0-1
--------------------------------------------
Total receive : 10
Total drop : 10
Drop for role host : 10
Drop for M-flag : 0
Drop for O-flag : 0
Drop for hoplimit : 0
Drop for preference : 0
Drop for src MAC acl : 0
Drop for src IPv6 address acl : 0
Drop for RA prefix acl : 0
Drop for others : 0
---------------------------------------------
12.3.1概述
简介
ND Snooping是针对IPv6 ND(Neighbor Discovery,邻居发现)的一种安全特性,用于二层交换网络环境。通过侦听用户重复地址检测DAD(Duplicate AddressDetection)过程的邻居请求报文NS(Neighbor Solicitation)来建立ND Snooping动态绑定表,从而记录下报文的源IPv6地址、源MAC地址、所属VLAN、入端口等信息,以防止后续仿冒用户、仿冒网关的ND报文攻击。
12.3.2配置举例
1.组网拓扑
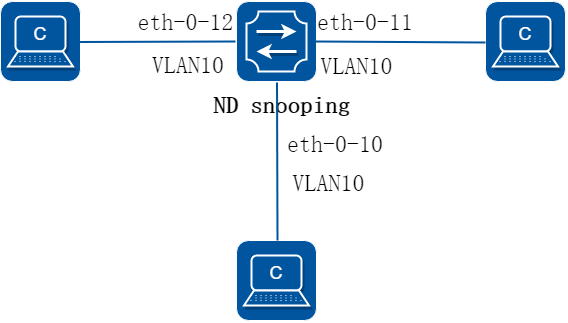
图12-3ND Snooping
2.配置步骤
步骤 1进入配置模式
Switch# configure terminal
Switch# ipv6 enable
步骤 2进入vlan配置模式并创建vlan
Switch(config)# vlan database
Switch(config-vlan)# vlan 10
Switch(config-vlan)# exit
步骤 3进入接口配置模式,配置接口属性
Switch(config)# interface eth-0-10
Switch(config-if)# switchport
Switch(config-if)# switchport access vlan 10
Switch(config-if)# ipv6 nd snooping trust
Switch(config-if)# no shutdown
Switch(config-if)# exit
Switch(config)# interface range eth-0-11 to eth-0-12
Switch(config-if)# switchport
Switch(config-if)# switchport access vlan 10
Switch(config-if)# ipv6 nd snooping check na enable
Switch(config-if)# ipv6 nd snooping check ns enable
Switch(config-if)# ipv6 nd snooping check rs enable
Switch(config-if)# no shutdown
Switch(config-if)# exit
步骤 4使能nd snooping全局特性
Switch(config)# ipv6 nd snooping vlan 10 enable
Switch(config)# ipv6 nd snooping static-prefix 2003::/64 vlan 10
Switch(config)# ipv6 nd snooping max-prefix-number 100
Switch(config)# ipv6 nd snooping max-user-bind-number 100
步骤 5退出配置模式
Switch(config)# end
步骤 6检查配置
根据如下步骤,检查接口配置是否正确。
Switch# show running-config interface eth-0-10
!
interface eth-0-10
switchport access vlan 2
ipv6 nd snooping trust
!
Switch# show running-config interface eth-0-11
!
interface eth-0-11
switchport access vlan 2
ipv6 nd snooping check na enable
ipv6 nd snooping check ns enable
ipv6 nd snooping check rs enable
!
Switch# show running-config interface eth-0-12
!
interface eth-0-12
switchport access vlan 2
ipv6 nd snooping check na enable
ipv6 nd snooping check ns enable
ipv6 nd snooping check rs enable
!
使用如下命令,查看nd snooping的相关配置。
Switch# show ipv6 nd snooping global information
ND Snooping Global Information:
----------------------------------------
ND Snooping enable on vlan : 1/108
Prefix entry number : 1/100
User bind entry number : 1/100
ND Snooping Detection : Disable
Detection transmit times : 2
Detection tranmit interval(msec) : 1000
Transmit times : 2
Transmit interval(msec) : 1000
----------------------------------------
使用如下命令,显示前缀管理表的相关信息。
Switch# show ipv6 nd snooping prefix
prefix table:
Prefix Length Valid-Time Vlan Prefix-type
---------------------------------------+------+----------+----+-----------
2003:: 64 - 10 static
Prefix table count: 1
Switch# show ipv6 nd snooping prefix detail
prefix table:
-------------------------------------------------------
Prefix : 2003::
Prefix Length : 64
Valid Lifetime(sec) : -
Preferred Lifetime(sec): -
Interface : -
VLAN ID : 10
Prefix Type : static
Aging Time Left(sec) : -
-------------------------------------------------------
Prefix table count: 1
使用如下命令,显示动态绑定表的相关信息。
Switch# show ipv6 nd snooping user-bind
ND Snooping User bind Table:
----------------------------------------
Ipv6 Address : 2003::1
Mac Address : f48b.6f1d.ad00
VLAN ID : 10
Interface : eth-0-12
User state : Bound
Aging Time Left(sec) : 2516181
----------------------------------------
使用如下命令,显示nd snooping的报文统计信息。
Switch# show ipv6 nd snooping statistics interface eth-0-10
ND Snooping statistics on: eth-0-10
Packet Type Discard Receive Send
-----------+----------+----------+----------
NS 0 0 0
NA 0 0 -
RS 0 0 -
RA 0 1 -
Total 0 1 0
---------------------------------------------
DUT1# show ipv6 nd snooping statistics interface eth-0-12
ND Snooping statistics on: eth-0-12
Packet Type Discard Receive Send
-----------+----------+----------+----------
NS 0 1 0
NA 0 0 -
RS 0 0 -
RA 0 0 -
Total 0 1 0
---------------------------------------------